


On this page
A floor can look perfect on the day it is finished and still become a problem a year later. Boards cup, vinyl planks gap, tile cracks along a seam, and laminate lifts near a doorway. When it happens, the call goes to the installer, and the first questions are about the work you did and the conditions you worked in.
Many causes sit outside the installer’s control: moisture in the slab, a subfloor that was out of tolerance when the job began, humidity changes in the home, or heating set higher than the manufacturer allows. The difficulty is proving it. If the only evidence is memory, the installer is defending a floor with nothing to show.
A consistent photo record changes that. This guide covers what flooring installers should document at each stage, how to organize the photos so they can be found quickly, and how to turn them into reports that protect warranties and close out jobs.
Why Flooring Needs Its Own Documentation Approach
Most trades photograph the finished work. Flooring is different because much of what determines success is hidden or short-lived:
- The subfloor disappears. Once the floor goes down, the condition of the slab or substrate is no longer visible.
- Moisture readings are momentary. A reading is true on the day it is taken, and the number is only worth anything if the conditions are recorded with it.
- Materials change over time. Product labels and lot numbers are on packaging that is thrown away within days.
- Existing damage is easy to forget. Scratched walls, marked cabinets, and worn thresholds are blamed on whoever worked last.
- Warranties depend on process. Manufacturers often ask for evidence of preparation and environmental conditions, not just a picture of a finished room.
BlitzzCam is built for this kind of record. Every photo is stamped with GPS and time at capture and saved to the right job, so a reviewer can see where and when each image was taken. See the flooring installer page for how BlitzzCam supports flooring crews.
The Photo Record, Stage by Stage
Think of the job as five stages. Each has a short list of photos that tell the story of the installation.
Stage 1: Existing conditions before any work
Before moving furniture or removing a single board, photograph the space as you found it.
- Each room from the main entry and from opposite corners
- Baseboards, trim, cabinets, door frames, and walls near the work area
- Existing damage such as scratches, chips, stains, or sagging thresholds
- The current floor, including worn areas, gaps, lifting, or visible movement
- Appliances, stairs, and fixtures that will affect the layout
These images protect you from claims about damage that was already there. Capture wide shots first, then close-ups of anything that could later be disputed.
Stage 2: The subfloor after demolition
The state of the substrate is the most valuable evidence in the file. Once the old floor is removed, document what is underneath before preparation starts.
- The full substrate in each room, with the surface condition visible
- Cracks, patches, stains, uneven areas, or signs of past moisture
- Fasteners, squeaks, or movement in wood subfloors
- Any repair, grinding, patching, or leveling you perform, photographed before and after
- Measurements taken with a straightedge or level, with the tool and reading in the frame
If the substrate is not suitable for the specified product, photograph the issue, record what you told the client, and note how it was resolved. That record shows you identified the condition rather than ignoring it.
Stage 3: Moisture and environmental readings
Moisture is behind a large share of flooring complaints, so this stage deserves the most care.
- Photograph the meter, probe, or test kit in place, with the reading clearly visible
- Take readings at several points, such as the center, near exterior walls, near plumbing, and at corners, and photograph each one
- Include a wide shot showing where the reading was taken
- Record the room conditions, such as temperature and humidity, when relevant to the product
- Photograph any test kits left in place, at placement and at the end of the test period
Each photo is stamped with GPS and time, which gives the reading a verified date and location. If a reading is outside what the manufacturer allows, photograph it and keep a written record of the decision that followed, including who was informed and when.
Stage 4: Materials, acclimation, and products
Materials are easy to document and rarely documented.
- Product labels, lot or batch numbers, and style and color codes before the cartons are opened
- The quantity delivered and how it is stored on site
- Acclimation setup, showing how the material is stacked and where it sits in the home, and the date it arrived
- Underlayment, adhesive, fasteners, and sealers, including product names and label information
- Any mix of batches, with a photo showing how they were separated or blended
Lot numbers matter most for products with color or tone variation. A dispute about mismatched shade is far easier to settle when the label is in the record.
Stage 5: Installation and completion
You do not need to photograph every row. Capture the points where decisions are made and where problems tend to start.
- The starting line, layout direction, and expansion gaps at the perimeter
- Pattern starts, such as herringbone, chevron, or tile layout lines
- Doorways, thresholds, and transitions before trim is fitted
- Areas around fireplaces, cabinets, stairs, vents, and pipes
- Any place where the layout deviates from the plan, with a note explaining why
- The finished room from the same positions as the before photos
- Transitions, reducers, and trim, close up
- Expansion gaps and how they are covered by baseboard or trim
- Cleanup and the condition of the surrounding area on departure
Matching the finished shots to the first set of existing-condition photos gives you clear before and after comparisons, which also support the final invoice.
Choosing Between Photos, Video, and Notes
Photos remain the core of the record, but notes and short video add context.
Photos show condition and measurements.
Short videos are useful for walking a room, showing a threshold from several angles, or capturing movement or sound, such as a squeak in a subfloor.
Notes explain what the photo cannot, for example the reason a layout changed or why a product was selected.
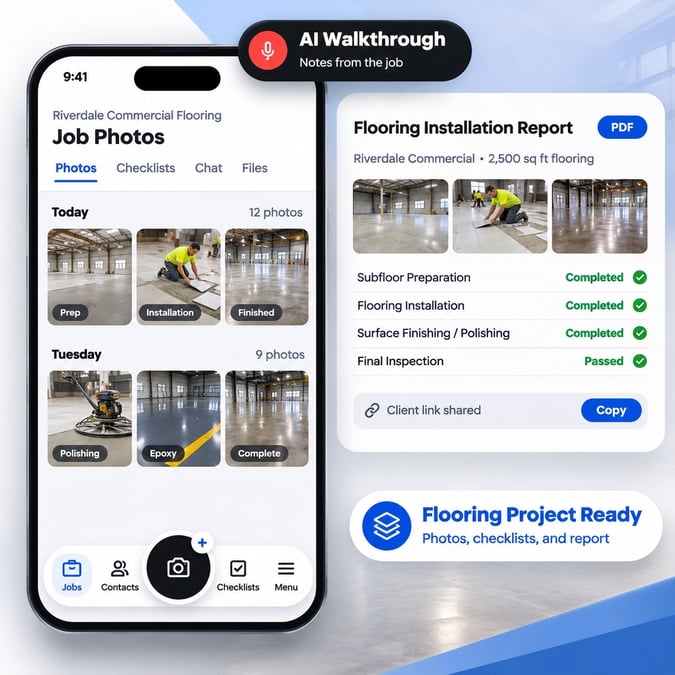
BlitzzCam’s AI Walkthrough lets installers describe what they see while they photograph. AI turns that narration into notes on the job, so crews do not have to type with dusty hands. On the flooring page, an example narration reads: “Subfloor is flat within an eighth over ten feet. Moisture reading passed. Starting LVP in the living room.” That single sentence captures what would otherwise take several minutes to write.
Organizing the Photos So You Can Find Them
A folder of hundreds of unlabeled images is almost as unhelpful as having no photos. Organization determines whether the record is usable when a question arrives.
One job, one record. Every photo should be saved to the specific job and address, not to a personal camera roll. In BlitzzCam, jobs hold their own photos, notes, and reports. The job photo guide shows how to create a job and capture photos inside it.
Use room and stage labels. Photos tagged by room and stage, such as subfloor, moisture test, or transitions, are easy to find. BlitzzCam can tag photos automatically by room, stage, and product as they arrive.
Follow a checklist. A standard photo checklist for flooring jobs defines the required photos in advance. Every installer captures the same baseline, and nothing is left to memory.
Keep a timeline. The project timeline shows the job day by day, from first visit to completion, which is useful for multi-day installations.
A Flooring Photo Checklist You Can Adapt
Use this list as a starting point for a job template.
Before demolition
- Entry and corners of each room
- Existing floor condition and damage
- Walls, trim, cabinets, and doors near the work area
After demolition
- Full substrate in each room
- Cracks, patches, stains, or movement
- Leveling or repair work, before and after
Moisture and conditions
- Meter or test kit with reading visible, at multiple points
- Wide shots showing test locations
- Environmental readings where relevant
Materials
- Product labels and lot numbers
- Acclimation setup and arrival date
- Underlayment, adhesive, and fasteners
Installation
- Starting line and expansion gaps
- Pattern starts and layout changes
- Doorways, thresholds, and transitions
Completion
- Finished room from matching positions
- Transitions, trim, and baseboards
- Cleanup and surrounding area
Offline Capture for Basements and New Builds
Flooring jobs often take place in basements, new construction, and rural properties where cell coverage is poor. A photo app that needs a connection can leave gaps at exactly the moments that matter most, such as moisture readings on a concrete slab.
BlitzzCam lets installers keep capturing photos without a signal. Images sync automatically once the device is back in range, with the original GPS and timestamp intact. For practical tips, read Top 10 Best Practices for Offline Construction Photo Documentation.
Turning Photos Into a Report
The record is most useful when it can be shared in a clear, organized form. After the installation, assemble a report that includes:
- The existing conditions summary
- Subfloor photos and any preparation work
- Moisture readings and conditions
- Product and lot information
- Installation highlights and finished photos
- Care and maintenance notes for the specific product, if you provide them
AI reports build an install report from the job’s photos, notes, and checklist results. Through reports and sharing, installers can send the homeowner a PDF or a live link to the job timeline, with no app download or login needed. A copy of the same report can be sent to a manufacturer if a warranty question arises.
Documentation That Protects Warranty Claims
When a manufacturer reviews a claim, the questions are usually predictable. Was the subfloor prepared correctly? Were moisture levels acceptable? Was the product acclimated? Was the installation completed to specification?
A strong warranty file typically contains:
- Substrate photos before preparation and after
- Moisture readings, with the location and date of each
- Acclimation records
- Product labels and lot numbers
- Installation details at key points
- Finished photos with date and location verified
Filing these on the job from the start means the evidence is ready when the claim arrives, even a year or two later. For more on how verified records support proof of work, see proof of work and How BlitzzCam Protects Contractors From Damage Disputes.
Using Photos to Win More Work
Documentation is not only defensive. A clean set of before and after images is also a sales tool.
- Keep a library of finished jobs organized by product and room type
- Use before and after photos with the same framing to show the difference clearly
- Share a client link at the end of each job so homeowners can pass it to friends and family
- Ask customers for permission before using photos publicly, and avoid images that show personal items or identifying details
A shared record also shows clients what they paid for, which reduces questions about the invoice.
Common Mistakes in Flooring Documentation
- Photographing only the finished floor. The evidence that matters most is underneath and beforehand.
- Taking a moisture reading without a photo. A number on a piece of paper is hard to verify.
- Skipping product labels. Packaging is discarded quickly, and the label cannot be recovered.
- Photos with no context. A close-up with no room, location, or job attached is hard to use.
- Keeping photos on personal phones. The record leaves with the installer or is lost when the phone is replaced.
- Documenting inconsistently. A strong record on one job and none on the next weakens the standard.
- Waiting until a problem appears. By then, the details are hard to reconstruct.
Keeping Crews Consistent
If your company has more than one installer, consistency matters as much as the individual photos.
- Use the same checklist template for each job type
- Require capture inside the job rather than in the native camera
- Set roles and permissions so managers can review jobs and installers can add photos. Admin controls provide roles, groups, and an activity log
- Review a small sample of jobs each week and give quick feedback
- If you use a scheduling or CRM system, connect it so jobs flow into the photo record. See BlitzzCam integrations
For getting your team started, see Getting Started With BlitzzCam: Setting Up Your First Project.
A Realistic Time Investment
Installers often worry that documentation will slow the job. With a checklist, a consistent routine, and voice notes instead of typing, the extra time is modest, usually a few minutes at each stage. Set against the cost of a single disputed installation, it is a small price.
Start With the Next Job
You do not need to change everything at once. On the next installation, photograph the existing conditions, the subfloor, and the moisture readings, record the product labels, and take a set of finished photos from matching positions. Save all of it to one job and send the client a report at the end.
Once that routine feels natural, build a checklist from it and use it on every job. Over time you will have a library of records that protects your warranties, answers client questions quickly, and shows the quality of your work.
BlitzzCam gives flooring installers verified, organized photo documentation on every job. Start your free trial or book a demo to see how it works for your crews. Pricing details are on the pricing page.

Blitzz Team
The Blitzz Team writes about remote video support, virtual inspections and field service. Our guides come from working with home builders, property managers, warranty teams, contact centers and field service organizations that use Blitzz to see and solve issues without a truck roll.